
A lot of us often carry crucial data on USB flash drives. Many of us even use USB flash drives to backup essential data. If you also have data on USB or backup PC’s data to USB flash drives, you should use password protect your USB drives to protect your data if you ever lose your USB drives.
There is much software around to lock the data on your USB drive with a password. Most of the USB flash drive manufacturers include their software to protect USB drives. For instance, there is official software to safeguard SanDisk USB Flash Drives. Likewise, you can password protect Western Digital External Drives using WD Security Software.
The thing is that most of us format the USB drive or delete all the software on the USB drive before start using it. In addition to official software, tens of third-party software are available to password protect data on your USB drive. But why use third-party software when there is a built-in feature in Windows 10 and MacOS to protect your USB flash and hard drives.
If you have the Windows 10 Pro or Enterprise Edition, you can use the built-in BitLocker To Go to password protect your USB flash drive with ease.
But, if you use MacOS, you can protect a drive using the disk utility feature.
This article is all about making your flash drive password protected so, let’s dive into it.
How To Password Protect A Device By Using Windows 10 BitLocker
Password protecting a USB flash drive or external USB hard drive with BitLocker is not much problematic. Follow the given steps below to password protect your USB drive using BitLocker on Windows 10.
- You need to connect your USB flash or hard drive to your Windows 10 PC running Pro or Enterprise Edition.
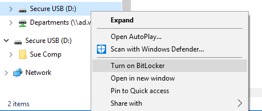
- Navigate to This PC. Now, right-click on the USB drive and then click Turn On BitLocker option.
- Select Use A Password To Unlock The Drive check box, enter a password to protect your data on the USB drive. Again, reenter the password to verify the password, and then click the Next button.
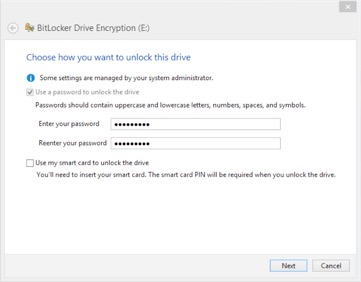
To make a strong password, you need to use 12 characters long, uppercase, and lowercase alpha-numeric characters and symbols.
BitLocker provides you three ways to back up the recovery key. You can either save the key to your Microsoft account (if you are using one to sign in), save it to a file, print the recovery key, and keep it in a safe place.
- Click any one of these options to back up the key.
- Click Next Button.
- Next, you will see Choose how much of your USB drive to encrypt screen with two options:
# Encrypt used disk space (faster and best for new PCs and drives)
# Encrypt the entire drive (slower but best for PCs and drives already in use)
- We recommend you select the Encrypt entire drive option.
- Click the Next button.
- Finally, it would be best if you choose which encryption mode to use. You can choose any method you wish, but we suggest you select Compatible mode. This mode is best for drives that can be moved from this device.
- Click the Next button.
- Click the start encrypting button to begin encrypting your drive. Depending on what you have chosen in the previous step, it might take a few minutes or even hours. It might take a few minutes or even hours.
- You can use your PC and continue during this process. Once the encryption is done, you will see the “Encryption of X is complete” message. You may now disconnect the drive.
Accessing the Password Protected Drive
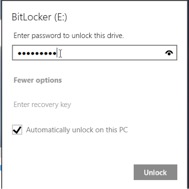
Connect the USB drive and open This PC to see your USB drive.
Double-click on the USB drive icon. A prompt will pop-up asking you to enter the password. Type in the password and then click the Unlock button to access the data on your USB drive.
How To Change Your BitLocker Password
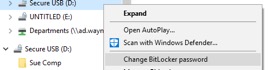
If you want to change the password used to encrypt your USB flash drive securely, right-click on the drive inside File Explorer and choose the Change BitLocker password. You will be advised of your old password, as well as a new password to use.
How To Disable Your BitLocker Password
If you don’t wish to utilize encryption on your USB flash drive, you can permanently disable it. The action will remove the encryption and allow you to use the drive on computers that do not support BitLocker and always stop securing your USB Flash Drive data.
- To do so, right-click on the drive in the File Explorer and tap on Manage BitLocker.
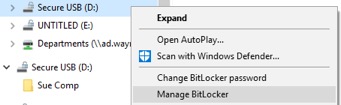
- Click on Turn Off BitLocker for the drive you wish to remove decryption.
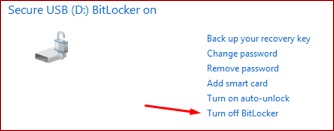
- Upon confirming your action, Windows will remove encryption from the USB flash drive; this action will take some time. Once complete, you can withdraw your USB flash drive and use it generally without restriction.
How To Password Protect Your Flash Drive By Using MacOS Utility Disk
It will format the external drive and erase all of its contents. Backup your data and all contents before proceeding, and do not lose the set password.
- Launch Disk Utility from /Applications/Utilities/
- Connect with the drive you want to password protect
- Choose the drive in Disk Utility, and tap on the Erase tab.
- Scroll down the Format menu and choose Mac OS Extended (Journaled, Encrypted)
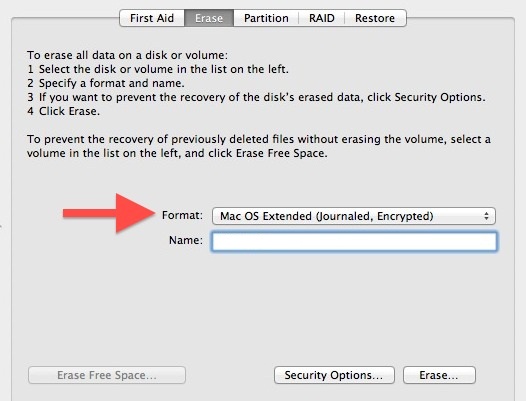
- Tap on Erase
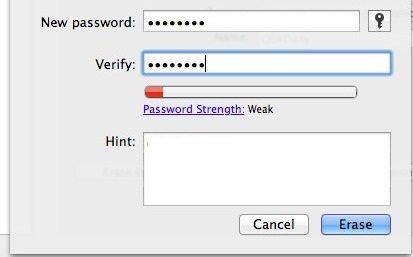
- Set a password at the next screen – do not lose this password, or you will lose access to the data.
- Set a reminder that isn’t obvious, and then clicks on Erase
- Let Disk Utility run; when finished, the drive partition will show up on the desktop. The drive will be accessible now without a password allowing files to be transferred over. Eject the disk when finished to require a password upon further mounting and usage.
- Once the drive has been ejected, connecting it will require a password before it is even mounted. That screen will look like this:
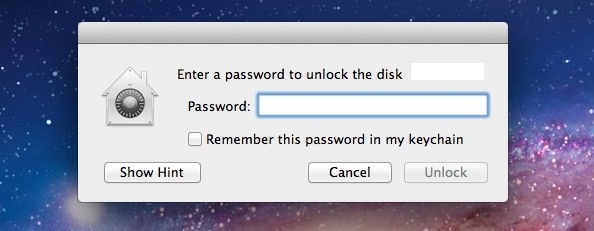
Clicking on the Remembering password in the keychain will allow the drive to be mounted on a Mac without entering that Mac’s password. But it will still require a password to be used on another Mac. For Maximum security, it’s best to leave that option unchecked.
For a system-wide security measure, don’t forget to protect a mac with both login and screen saver passwords.
How To Password Protect Your Device Using Third-Party Software
Protecting your files from unauthorized access is essential and relatively simple. Much specialized software can help you save your files from unauthorized access.
This software allows you to protect the files and folders stored on your USB flash drive, encrypt them, and add a password to secure your files.
The 10 Third-party software that we have selected are:
- folder lock
- Gilisoft USB Encryption
- Rohos Mini Drive
- USB Safeguard
- USB Secure
- Cryptainer LE
- DiskCryptor
- USB Security
- USBCrypt
- USB Locker
Conclusion
Protecting your flash drives or external drives has become necessary with the increase in cyberattacks. You need a backup of your data in a secure place. Securing a USB flash drive or external drive with a Password is ideal for securing your data. Using the default methods like Windows BitLocker or MacOS encryption feature is one of the best ways to encrypt the drive.
Using third-party software is safer, but accessing your drive on another device would cost you much time downloading and installing the software.